Showing posts with label copics. Show all posts

Tuesday, September 26, 2023

Batty For You


There's a bit of a chill in the air and the stores are loading up shelves with tasty treats...that can only mean Halloween is right around the corner!  Whether for the upcoming holiday or to tell someone they are pretty special to you, Lawn Fawn's Batty For You is a darling set to use!


Here is how I created my card:


1)  First I layered black cardstock onto the card base.

2)  On a piece of white cardstock - cut 1/4" shorter than the black layered piece - I placed a diecut circle in the left-hand corner and taped the part that came off the card with Spellbinders Best Ever Craft Tape just to hold it in place.

3)  Then, I blended these Distress Oxide Inks onto the white piece going from the bottom to the top:  Spun Sugar, Picked Raspberry, Faded Jeans and Chipped Sapphire with Ranger Mini Ink Blending Tools.

4)  Taking watered-down black paint and Tim Holtz Splatter Brush, I added splatters to the card.


5)  Removing the diecut circle, I then blended Distress Oxide Hickory Smoke ink using Tim Holtz Bubble Layered Stencil in a few places on the white, unblended circle.

6)  The Lawn Fawn Batty For You images were stamped with Honey Bee Stamps Intense Black Ink and Copic colored (see colors listed below) and cut them out with the Lawn Fawn Batty For You coordinating dies.

7)  After arranging the pieces, I adhered the colored images and sentiment strip using Scrapbook Adhesives 3D Foam Strips.

8) Using the star dies in the die set, I cut shiny silver cardstock and randomly adhered the stars to the card.


Products Used:


Copic Sketch Markers:


Monday, August 28, 2023

Happy Fall Y'all


Hey, Crafty Friends - are you excited that Fall is right around the corner!  Kathy here sharing my last card as a Gerda Steiner Designs Guest Designer - it's been SO much fun and am so grateful to have had this opportunity to highlight some fabulous goodies from Gerda Steiner Designs!!


For my card, I first layered dark brown cardstock to the card base.  I then layered several different fall-themed pattern papers to the dark brown cardstock base.  Using a pierced circle die, I cut orange cardstock for a backdrop to the copic colored images.

This darling squirrel and branches/leaves images from the HAPPY FALL stamp set were Copic colored and fussy cut then popped up onto the card.  The sentiment, also from this set, was stamped onto yellow cardstock and cut with a mini banner die then popped up onto the card.


 Here's to a blessed, happy Fall season to all!

Tuesday, August 22, 2023

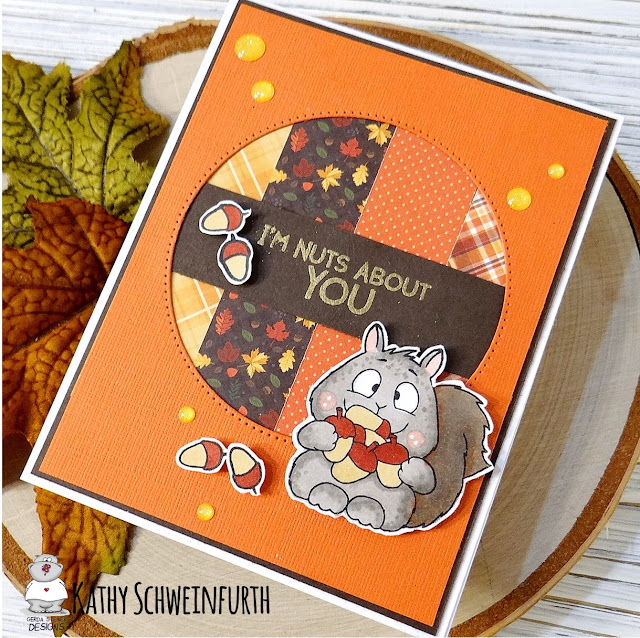
I'm Nuts About You


Who's ready for fall?!  Kathy here sharing one of my first fall cards featuring the ADORABLE new, NUTS ABOUT YOU stamp set!

While summer is one of my favorite seasons, I'm looking forward to cooler weather and getting out my light sweaters.  Not to mention, I love fall colors!


For my card, I layered dark brown cardstock onto the card base.  I took strips of four different fall pattern papers and glued them together.  I then took orange cardstock, die cut a circle opening and then adhered the strips of pattern paper behind the opening before adhering the entire orange cardstock piece to the dark brown cardstock.

Is this little guy the cutest or what?!  Our little squirrel friend, acorns and sentiment are from the new NUTS ABOUT YOU stamp set.  The images were copic colored, fussy cut and popped up onto the card.  The sentiment was gold heat embossed onto a strip of  brown cardstock then placed in the center of the die cut circle opening; tucking in the ends.  To finish, I added yellow glitter enamel dots.


Saturday, June 17, 2023

Just Plane Awesome


Wheee!  Our favorite, playful Lawn Fawn mice are back - this time having all sorts of fun with paper airplanes.  It's just "plane" awesome to create with them!


 Here's how I created my card...

 
1.  I layered two different Lawn Fawn pattern papers onto the card base.
 
2.  The little mice and paper airplanes are from the Lawn Fawn Just Plane Awesome stamp set - which are colored with Copic Sketch Markers (see below for colors I used) - and cut out with the Lawn Fawn Just Plane Awesome Dies
 
3.  Using the Lawn Fawn You're Just My Type stamp set, I paper pieced the desk image and fussy cut.
 
4.  The framed sentiment is from the Lawn Fawn Love Poems stamp set.
 
5.  I added a few other little images from other Lawn Fawn sets, too.  The scissors are from the Sew Very Nice stamp set and the plant, cup of tools and sitting mouse are from the Lawn Fawn Virtual Friends Add-on stamp set.


6.  I arranged all the images on my card to where I wanted them, then popped them up with Scrapbook Adhesive 3D Foam Strips to adhere them to the card. 
 
7.  Lastly, I stamped the 'wheee' sentiment on to the card which is found in the Lawn Fawn Just Plane Awesome stamp set
 
Creating scenes with Lawn Fawn stamps/dies is so FUN and I love how I can use my imagination and get really creative by coordinating images and sentiments from different Lawn Fawn sets, too!!
 
 
Products Used:
 
Copic Sketch Markers:
YG23 - New Leaf

Monday, March 20, 2023

Oopsie Daisy Surprise


 How sweet is this little daisy hugging bear?!  These darling images and sentiment are from the new Dare 2B Artzy Oopsie Daisy stamp set and coordinating dies.  I layered the card base with Groovey Blooms Pattern Paper and placed the bear and daisy image on cardstock layers cut with Rectangle Fancy Framelit dies.


 And...surprise!!  I love the new Dare 2B Artzy Hide n Seek Card Die!  It's very easy to put together and I adore how it makes a fun interactive surprise inside a card!  I used the
Oopsie Daisy stamp set and coordinating dies and the other side of the Groovey Blooms Pattern Paper and Roll With It Paper Pack.


Tuesday, January 10, 2023

Wood You Be Mine?


Hey, crafty friends!  Kathy here and I'm so excited to share a sweet Valentine's Day project with you today!

My card features several wonderful Lawn Fawn goodies! 
 
1)  For the background, I cut light pink cardstock using Lawn Fawn Quilted Backdrop die. 
 
2)  I then used Lawn Fawn Leafy Tree Backdrop: Portrait to cut brown cardstock and placed the diecut over the Lawn Fawn Quilted Backdrop die and cut the leaves from red cardstock.
 
3)  To create the 'water', I cut aqua cardstock with the 'pond' die in the Lawn Fawn Stitched Pond Frame set.
 
4)  These adorable critters, images and sentiment are from the new Lawn Fawn Wood You Be Mine? stamps and coordinating dies.


Monday, November 14, 2022

Pawsome Stamps New Release is Here!


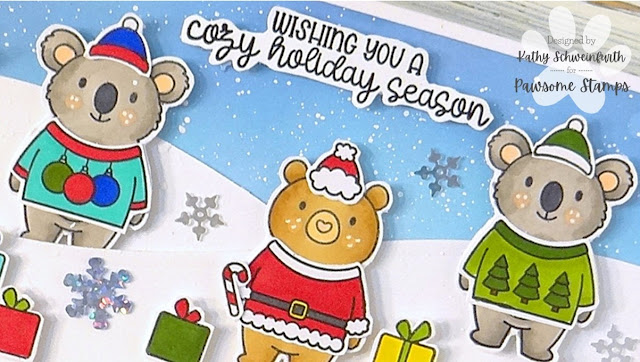
The NEW Pawsome Stamps Holiday release is here and it is FABULOUS!!   This exciting release is filled with wonderful stamps, dies and stencils to create amazing holiday cards, tags, journals and so much more!!

My card features the new Ugly Sweaters stamps (and coordinating dies)!  How cute are these little critters in their holiday sweaters?!!  This set includes a darling brown bear and koala bear plus several different holiday 'ugly' sweaters for these little guys to wear, fun hats, presents and perfect sentiments!


Saturday, September 10, 2022

Saturday Coffee Cafe - Fall Mugs

Happy Saturday and welcome to the Cafe!  I'm thrilled you stopped in today to see what's brewin'...

I LOVE fun, pretty, unique mugs and this new set - Cocoa For You - from Pink & Main is one of my favorites!!

For my slimline card, I cut white cardstock with Pink & Main Stitched Slimline Dies and used an Ergonomic Blending Brush to blend Distress Oxide Ink/Pads: Mustard Seed, Ripe Persimmon and Crackling Campfire.  I Copic colored these fabulous images and gold embossed the sentiment on dark brown cardstock cut with Pink & Main Stitched Rectangles Set 1.


Thursday, July 21, 2022

Pretty Winged Things


Gorgeous! While I LOVE this month's new release, I think this set is one of my favorites! There are so many color combos you can use to make these lovely images come alive...I know I'll be using this set over and over!


For each card, I used patterns from the BEE Kind Paper Pack and cut designs for each background with the Stitched Rectangles Set 1


I used different shaped dies as the backdrop for the images: Reverse Scallop Square Dies, Reverse Scallop Circle Dies, and Reverse Scallop Rectangle Dies.


To finish, I added some color coordinating enamel dots.

Wednesday, July 13, 2022

How Are You Doing?


In our busy lives we can’t always find the time to call folks just to see how they are doing.  Sending them a pretty card with a handwritten note is the next best thing!

1.  For my card, layered blue cardstock to the card base then embossed white cardstock with Altenew Organic Linen Embossing Folder that I brushed the edges with Distress Oxide Ink – Antique Linen.

2.  This lovely floral wreath and flowers are from the new Altenew Sentimental Florals Stamp set and coordinating dies.  There are extra flowers and leaves in the set which I used a few to tuck into the wreath and put at the bottom.  I did put the wreath on a slant - just liked it that way! It was very relaxing to Copic color all these pretty images.


5.  To finish, I gold embossed a sentiment from the same stamp set with Lawn Fawn’s Gold Embossing Powder.


Supplies Used:

Altenew Sentimental Florals Stamp set and coordinating dies

Altenew Organic Linen Embossing Folder

Distress Oxide Ink – Antique Linen

Ranger Mini Ink Blending Tool

MISTI Stamping Tool

Lawn Fawn’s Gold Embossing Powder

COPIC Sketch Markers:

B41, B45

R81, R85, R89

Y18

YG23, YG67

YR24, YR27