Showing posts with label sizzix. Show all posts

Saturday, January 28, 2023

Saturday Coffee Cafe - I'll Drink To That


Happy Saturday and welcome to the Cafe!  I'm so glad you stopped in today to see what's brewin'...


I started drinking coffee in my late teens.  There was always a pot of coffee on the stove (yes, those good 'ole peculator types) and practically everyone I knew drank coffee!  Whenever anyone came to visit, they'd bring a coffee cake or other cake to have with...a cup of coffee!  The moms would meet at a local candy store after dropping us kids off at school for...a cup of coffee together!  So, yes.  Coffee has been part of my life for a long time and I believe it to be therapeutic!!


For my slimline card, I layered dark brown cardstock and cut wood grain pattern paper with Divinity Designs Slimline Pierced Rectangles die.  These FABULOUS cups were created with Tim Holtz/Sizzix Papercut Cafe dies!  I was super excited to get this set to make these colorized cups - so fun and easy to create (much, much easier than some of the other colorized die sets)!


The 'coffee' word is from Honey Bee Stamps Coffee Dies - love the three layers which makes the words pop.  The sentiment is retired from Cas-ual Fridays.


Hope you get to put some 'zippity' into your doo-dah day with a delish cup of brew today!


Tuesday, January 24, 2023

Be Mine, Valentine


Even critters in the woods celebrate Valentine's Day just like this sweet little bunny!

 Here's how I created my card...

 
1)  I took white cardstock, embossed it with Sizzix/Tim Holtz 3-D Texture Fades Tree Rings Embossing Folder then blended Distress Oxide Walnut Stain for the background.
 
2)  The new Sizzix/Tim Holtz Wood Slice Thinlits are so fun. I cut light brown cardstock for the bases, dark cardstock for the second layer and ivory cardstock for the top piece then brushed Distress Oxide Walnut Stain on the ends and center.  I then cut red cardstock using the alpha dies in the die set to spell out "Be Mine".
 
3)  The pretty little flowers added are from Spellbinders Mini Blooms and Sprigs.
 
4)  The darling bunny peeking out from the wood slice was created with Sizzix Pocket Pals Thinlits.


Saturday, October 22, 2022

Saturday Coffee Cafe - Halloween Coffee Cart


Happy Saturday and welcome to the Cafe!  I'm so glad you stopped in today to see what's brewin...


How fun would it be to have a fall Halloween coffee cart?!!  I can almost smell the pumpkin spiced latte aroma!


For my card, I first embossed white cardstock with Sizzix/Tim Holtz 3D Brickwork embossing folder.  The wonderful cart is Honey Bee Stamps Market Cart Builder dies plus the Honey Bee Stamps Pumpkin Spice Market Cart Add-On.  Can't wait to make more of these darling cart cards!


Monday, February 28, 2022

Happy Trails


Wouldn’t it be a delightful surprise to be walking through the woods and come upon this magical place?!  It really is a ‘happy trail’!  See below for how I created this card…


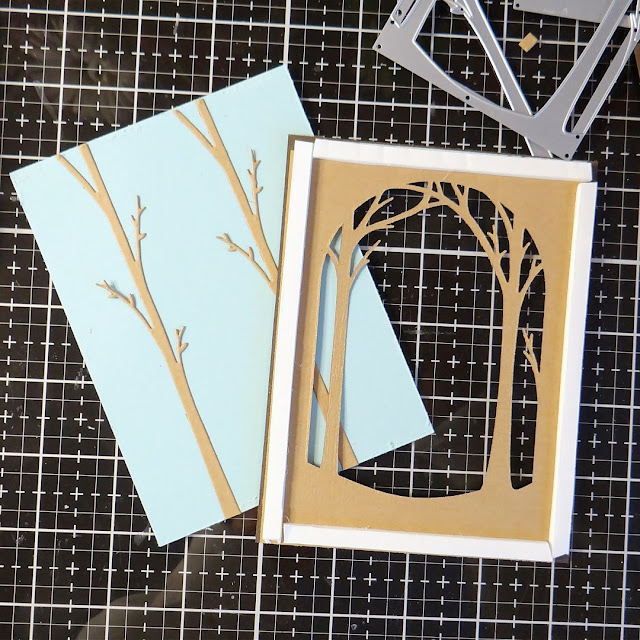
 1.  My first steps use the Sizzix Christmas Shadow Box die set.  To start, I cut a 4.25” x 5.5” piece of light blue cardstock and adhered two tree die cuts cut from kraft cardstock.

 2.  I then die cut the arch out of a 4.25” x 5.5” piece of brown cardstock. 

 3. Using the arched trees die, cut kraft paper and adhered it to the back of the brown cardstock with the arch cut out.


4.  I lined the back of the tree/arch piece with Scrapbook Adhesive Crafty Foam Tape.

 5.  There is a small hill die in the set which I used to cut kraft cardstock and added it to the bottom of the trees.  

 6.  I adhered this piece to the blue cardstock piece.

 7.  Then, I adhered these two pieces to the card base.


 8.  Now came the really fun stuff!  Using the new Sizzix Quirky Animals die set, I die cut the adorable animals, leaves and flowers from various color cardstock and assembled them.  The flowers are cut from white cardstock and Copic colored.  I blended some pink ink onto the bunny’s belly, cheek and tips of his ears.


 9.  I then arranged the leaves, flowers and animals as shown to fully create the woodsy forest scene!


10.  To finish, I used a sentiment from Honey Bee Pickup Lines stamp set which I gold embossed on brown cardstock, cut out with the Honey Bee Pickup Lines dies and adhered to the left, bottom of the card.

 Happy Crafting Trails!